Solar Harvest Farm Steve & Michelle Heyer Richie, Sheri & Sarah 7432 Marsh Road, Waterford, WI 53185
Phone: 262-662-5278 · Email: solarharvestfarm@yahoo.com Website: www.solarharvestfarm.com
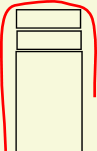
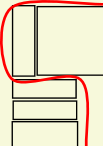
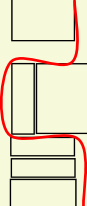
Step 1 Lay a strip of poly over the wall sill, (or mud sill in the case of the foundation). The strip should be tall enough to be lifted up and around the floor joists.
Step 2 Install the floor joists and subfloor (not shown) on top the poly. Pull the poly over the joists and subfloor.
Step 3 Build next floor wall on top of poly. (For roof joint, set rafters on top of poly.)
Once the batt insulation is installed, the wall vapor barrier can be installed and taped at the red X’s.
There are two major infiltration points at each wall joint - one above and below the joist. This occurs where the foundation meets the first floor, between upper floors as well as where the roof rafters meet the wall. Due to the long linear distances these joints create, the combined surface area creates the equivalent of a large whole in the wall for infiltration.